It seems like just yesterday when Google Merchant Center was launched, the tool every retailer needs to boost their business online.
And indeed, online sales have been steadily increasing lately: competition among e-commerce businesses has become fierce. That’s why we decided to play the good Samaritan and tell you everything you need to know to use Google Merchant Center and optimize your web marketing strategies.
Let’s make the competition fairer, one e-commerce manager at a time 💪.
Google Merchant Center is a free platform where retail merchants add their products. This way, they appear in the search results across Google’s various platforms, with information about their price, availability, etc.
In other words, Merchant Center allows you to manage how your products are advertised on Google Shopping, YouTube, Google Images, Maps, and more. This improves your online visibility, enabling you to directly reach users interested in buying what you offer.
Thanks to Merchant Center, your products appear in free listings (or paid ones, if you use Shopping Ads) that include relevant information for users interested in purchasing them. Generally, they appear at the top of the search results on each platform, as you may have noticed when searching on Google, Maps, and, of course, Google Shopping.
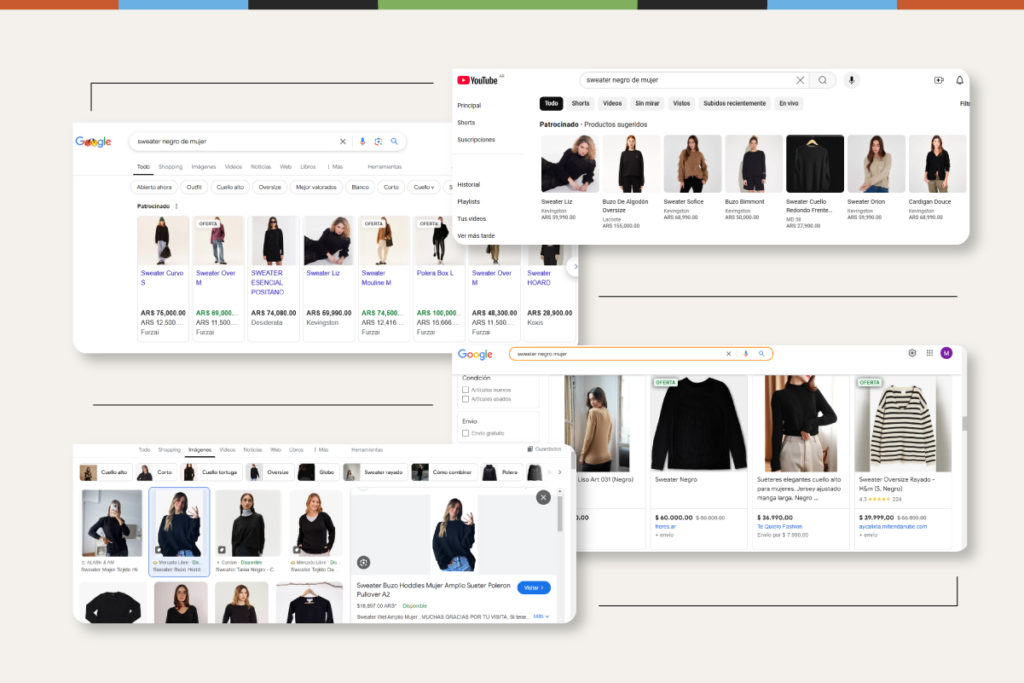
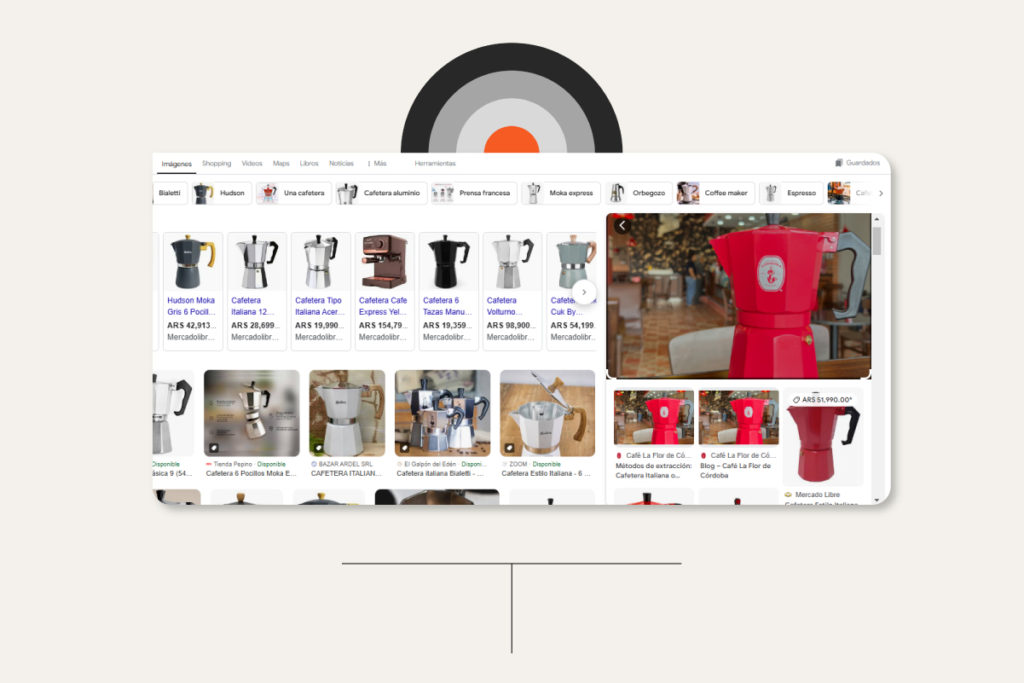
However, the possibilities of Merchant Center don’t end there. When you search for products on Google Images, for example, some have the “Product” tag (which is literally a tag icon). This indicates that the product in the image is available for purchase, and upon opening it, you can view information such as its price and availability.
Additionally, if customers use the Google Lens feature, they can see a list of products similar to the one shown in the image. As if that weren’t enough, the list displays enriched data such as price, availability, ratings, etc.
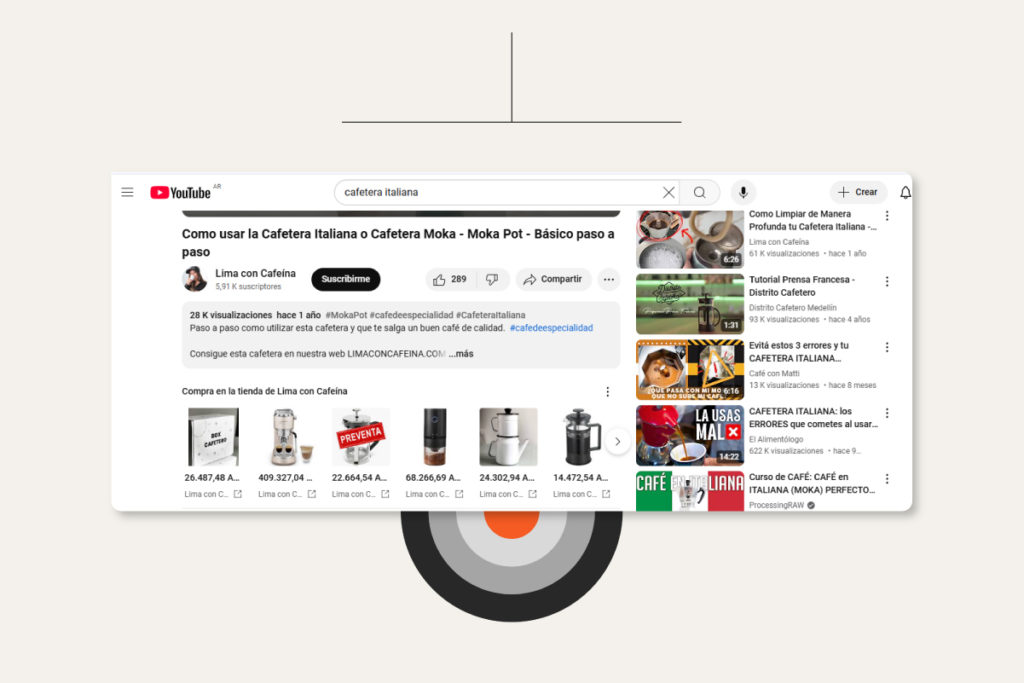
Even on YouTube, Merchant Center displays cards with products related to the topic of the video you’re watching. However, if the video’s channel is linked to an online store through Merchant Center, its products will be given priority.
What is Google Merchant Center for?
More and more clients come to us asking for an online store that not only serves as a point of sale but also attracts new leads—a two-in-one, so to speak. Thanks to Merchant Center (and, of course, good web optimization services), this is possible.
Broadly speaking, Google Merchant Center has two main functions:
- Storing data about an e-commerce’s products.
- Connecting an online store with various Google platforms to promote its products.
Based on these functions, it enhances the online presence of a web store, helping it reach more potential customers and, if successful, increase its sales volume.
Both functions include various features that make Google Merchant Center essential for ensuring the success of an e-commerce. Specifically:
Managing product catalogs
This tool allows you to manage a product catalog, which will generate “ads” (product listings) for related searches. It can be created manually or automatically. Additionally, its validity is 30 days to ensure all data is up to date.
Search optimization
Merchant Center catalogs include information such as the brands a business sells, the models and colors it offers, shipping options, among other details. All of this enables them to be optimized for search engines, enhancing their chances of reaching users.
Syncing your e-commerce with Google Shopping
To promote a store’s products on this platform, they must be uploaded to a Merchant Center catalog. This integration is essential for an e-commerce store as it increases its visibility for specifically transactional searches, improving its performance.
Integration with Google Ads
Based on the data stored in Merchant Center, Google enables the development of Shopping Ads campaigns. These allow a web store’s products to appear as sponsored search results, providing a smoother, more relevant, and personalized shopping experience.
Measuring the performance of your online store
This tool makes it possible to retrieve data about user interaction with Google Shopping listings and paid ads. In this way, it helps optimize both the online store itself and the digital marketing strategies used to promote it.
How does Google Merchant Center work?
Google Merchant Center functions as a database where the presentation of an e-commerce’s products on various platforms is managed. This management is primarily carried out through a data feed uploaded to Merchant Center.
The data feed of an online store is a structured file that includes information about the products the store offers. In other words, it’s a sort of proto-catalog.
There are four ways to upload a data feed to Google Merchant Center:
- Automatically, using e-commerce platforms compatible with this tool (like WooCommerce, WordPress, or PrestaShop).
- By importing a spreadsheet file (such as Excel or Google Sheets) containing your products. This tool offers a downloadable template where you can modify the pre-set attributes. Once complete, it must be uploaded as a “.txt” file.
- If you have the free time and patience, another option is to upload products one by one to Merchant Center. This option may work well for small businesses or those with a limited variety of products.
- Conversely, for large or complex accounts, the most recommended method is to upload your products using a content API.
Once the data feed is uploaded to Merchant Center, Google uses it to create a catalog of your store’s products and link them to user searches.
To achieve this, the data feed must be organized according to a series of specific attributes. Some are mandatory (such as the product title, image, description, and website link), others optional (such as brand, category, and custom labels), and others are specific to the type of product being sold.
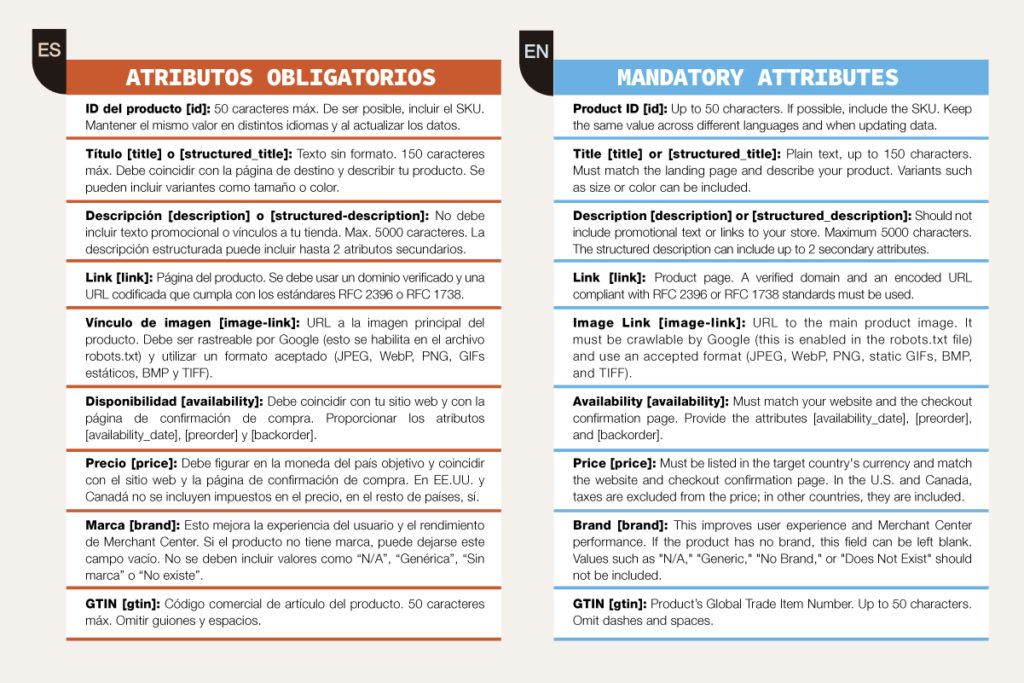
Whether the feed is well or poorly organized will, therefore, impact the visibility of the products and the conversion of users into customers. If the data doesn’t match your site, is outdated, or incomplete, it’s unlikely you’ll appear in search results…
Not to mention that users will likely have a poor shopping experience. We’ve all experienced finding the perfect product in an ad, only to click and discover that it’s no longer available.
Having a complete and up-to-date form is no small task when aiming to stand out among the legion of e-commerce sites on the internet. And not just because it improves your website’s visibility and relevance: building trust with your users is the first step toward achieving exponential growth. In other words, the data feed is the engine of Merchant Center. If it’s not well-done, nothing will start.
Linking with Google Ads
Once the feed is uploaded and the products are approved, Google will start displaying them in its free listings. Depending on how optimized your catalog is for certain searches and Google’s algorithm, your products may take more or less time to reach users.
However, you can speed things up a bit by linking your Merchant Center account with Google Ads. This is done via the “Settings” → “Linked accounts” → “Google Ads” section.
You’ll need to provide your Google Ads customer ID (a 10-digit number located at the top of your Ads account) and click “Link.”
A linking request will be generated, which you’ll need to approve from your Ads account via the “Tools & settings” → “Settings” → “Account access” → “Link requests” sections.
If the linking is successful, the data uploaded to Merchant Center will appear as “available inventory” for campaigns in the “Shopping campaigns” section of Google Ads.
The next step will be to set up your Google Shopping campaign. This is done in Google Ads. The first thing you’ll need to do when creating a new campaign is to determine its advertising objective (“Sales” or “Website traffic”).
Next, you’ll need to specify the type of campaign you’re going to run. To use the data uploaded to Merchant Center, select the “Shopping” option. Then, choose the product feed you want to promote.
The final step is to segment the Shopping Ads campaign and set a budget and bidding strategy (such as CPC or maximize conversions). Segmentation can be done based on geographic location, specific attributes, custom labels, or product categories.
Using the feed data, Google will automatically generate a series of ads that include:
- A product image.
- Its name and price.
- The store’s name.
- A link to the product page.
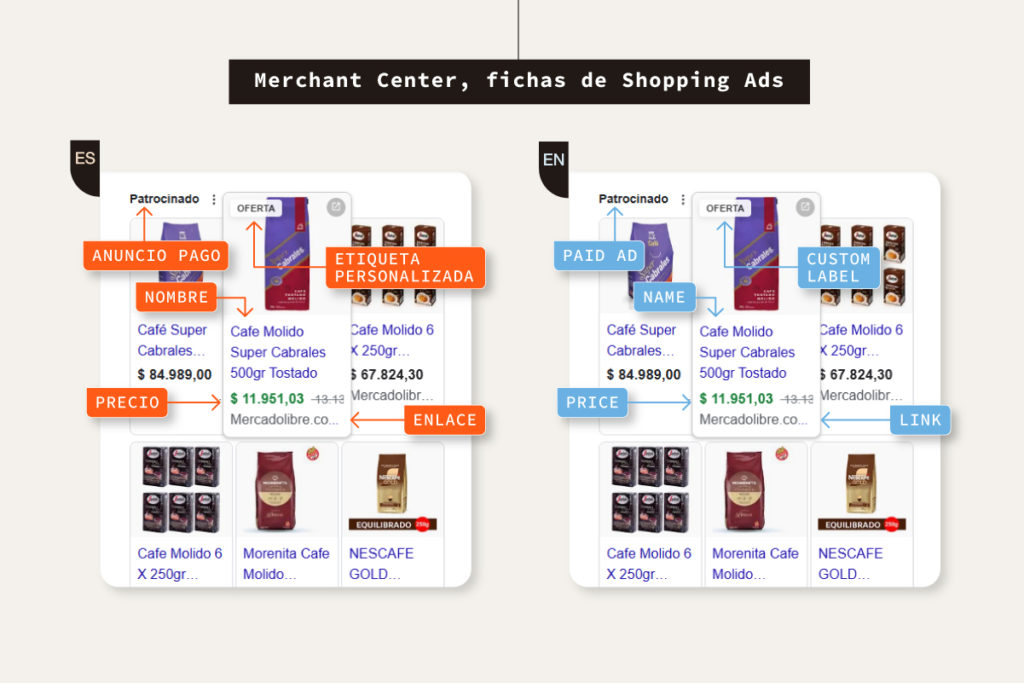
Google’s AI will direct those ads to specific users based on their interests and interaction with the web. Additionally, by collecting performance metrics, it enables the implementation of remarketing strategies.
All of this increases the relevance of your campaigns, maximizing their performance and ensuring that your ads reach the users most likely to engage with them.
Benefits of using Google Merchant Center
Beyond its integration with Google Ads (and, in some cases, precisely because of it), Google Merchant Center offers various benefits to its users. Specifically:
- Improves the visibility of your products and website, both through paid and organic methods, which can result in a higher number of sales.
- Supports multiple platforms, allowing you to manage all aspects of your ads from a single place.
- Automates data management and updates when synced with your e-commerce platform. This simplifies the management of extensive catalogs and reduces manual errors.
- Incorporates behavioral metrics, enabling precise segmentation of paid campaigns and optimization of your strategies.
- Provides a smoother shopping experience with accurate and updated information, helping users make better decisions. Additionally, it broadens users’ horizons by introducing them to new brands.
How to get started with Google Merchant Center
The impatience is probably kicking in. So, let’s go step by step with the instructions to help you start using Merchant Center as soon as possible.
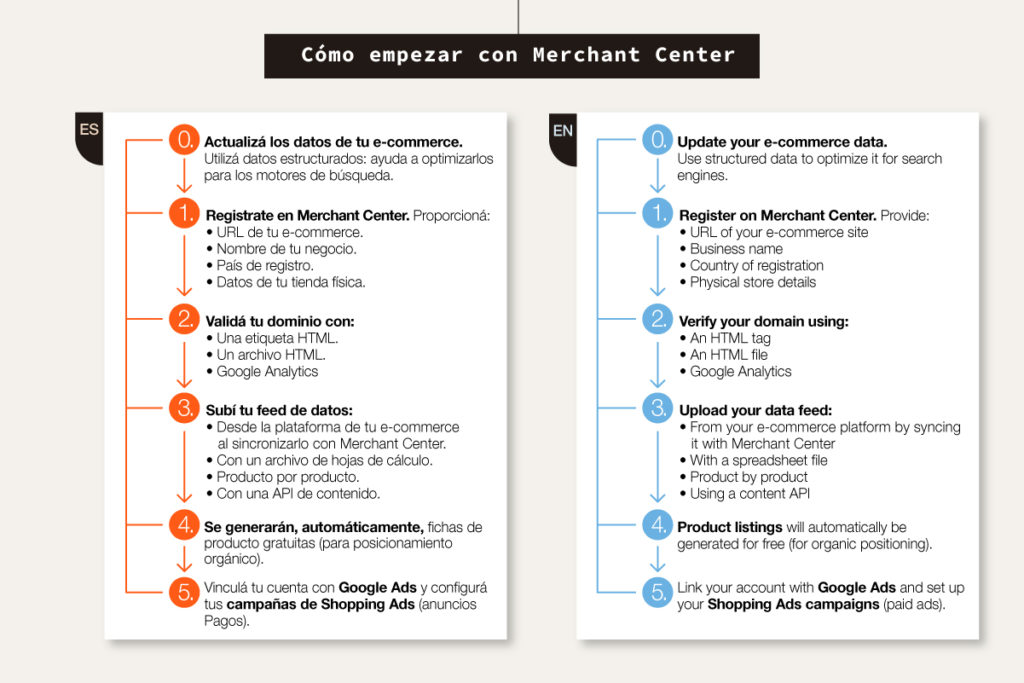
Step 0:
First of all, make sure all your e-commerce information is up to date and meets Google’s requirements.
If possible, use structured data in the schema.org format. This will help Google extract information from your website and, by cross-referencing it with the feed data, improve its accuracy when promoting your products in search results.
Generally, you’ll need to include the page title, price, availability, product ID, corresponding URL, and high-quality images.
Step 1:
The first step to begin with Merchant Center is to visit its website and sign up. You’ll need to provide some information about your online store, including:
- The URL of your e-commerce site.
- Your business name.
- A country of registration.
- Information about your physical store (if applicable).
Step 2:
The second step is to verify your domain so that Google knows you are the owner of your website. To do this, go to “Settings” → “Business information” → “Website”. Then, choose a verification method:
- HTML tag: Google will provide a code that you need to paste into the `<head>` section of your website.
- HTML file: Download a verification file from Merchant Center and upload it to the root directory of your site.
- Google Analytics: If you have an Analytics account, you can use your tracking code to verify the domain.
Once you’ve chosen your method, click “Verify” → “Claim URL”.
Step 3:
Once your domain is verified, you can add your data feed to Merchant Center using one of the methods mentioned earlier. To do this, click “Add your products”, select the country where you want them to appear, and choose the “Create feed” option.
Step 4:
Free listings, which will appear organically on users’ screens, will be generated automatically. You can check their status in the “Marketing method” section.
Step 5:
The final step to start operating with Merchant Center is to link your account with Google Ads and set up your Shopping Ads campaigns—if you want to take advantage of this functionality, of course.
Now, as you may have noticed, when using e-commerce platforms like PrestaShop or WordPress, this process has some variations. Let’s take a closer look at how this works.
How to link Google Merchant Center with popular platforms
Two of the most popular e-commerce platforms are PrestaShop and WordPress, which uses plugins like WooCommerce to function as a virtual store. Their flexibility and scalability, the fact that they offer free versions, and their SEO optimization features make them an ideal choice for launching an online store—at least, that’s what many of our clients believe.
Of course, as we’ve already mentioned, linking these platforms to Google Merchant Center has some particularities. So, let’s look at how to integrate your Merchant Center account with a WordPress or PrestaShop e-commerce platform step by step.
Linking with WordPress (without WooCommerce)
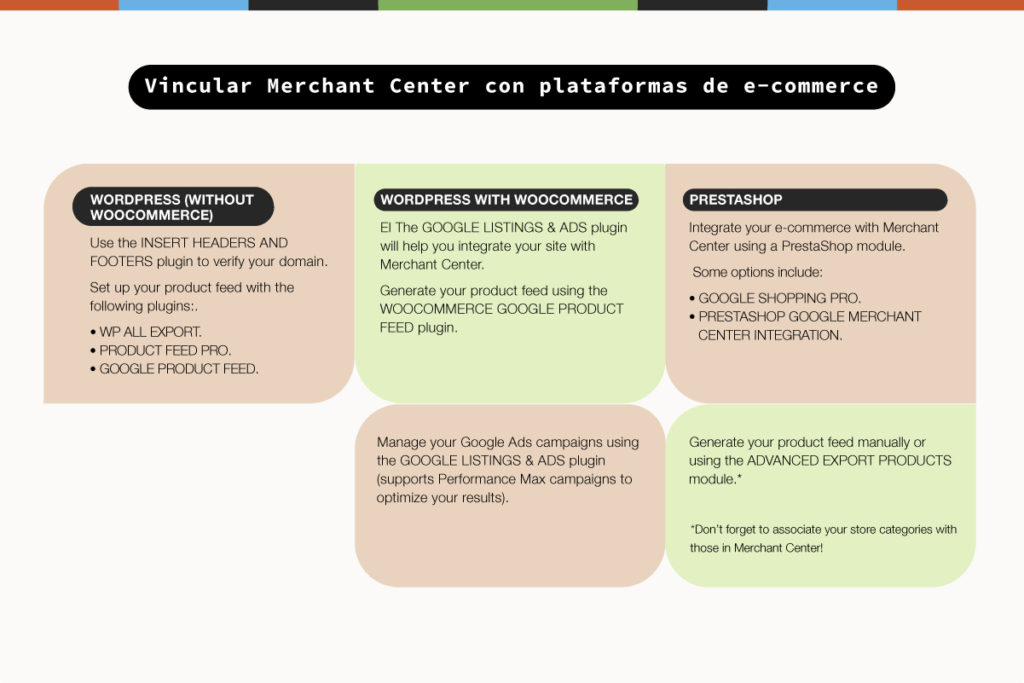
To successfully integrate a virtual store created with WordPress (without the WooCommerce plugin) into Merchant Center, the first step is always to incorporate structured data into your site.
Plugins like SEO Yoast and Rank Math are essential to ensure these are properly configured. Failing to do so can result in Merchant Center rejecting your products.
Next, you’ll need to verify your domain using one of the methods mentioned earlier. The plugin Insert Headers and Footers can simplify this process.
Afterward, you’ll need to set up your product feed. You can do this manually, in spreadsheet format, or automatically using a plugin.
- WP All Export, for example, exports your products from WordPress in a format compatible with Merchant Center (XML or CSV).
- Product Feed Pro and Google Product Feed also perform this function.
Linking with WordPress + WooCommerce
On the other hand, having a virtual store that uses WooCommerce simplifies the integration with Merchant Center.
The first step to link them (as you may already know) is to ensure that your page includes all the necessary information and, if possible, structured data. Once this is done, install a plugin developed by WooCommerce and Google for this integration: Google Listings & Ads.
Search for this plugin in the WordPress repository and install it. Then, in the WordPress menu, go to “Marketing” → “Google Listings & Ads”. The platform’s wizard will guide you through the steps to synchronize your Google Ads and Merchant Center accounts with your e-commerce store. Among other things, you’ll need to provide your Merchant Center account details and verify your domain on that platform.
Next, install a second plugin, WooCommerce Google Product Feed. Select the attributes required by Merchant Center (titles, prices, IDs, etc.) to configure a dynamic feed. Also, adjust the export options, which will allow you to specify whether the feed should include only certain products or all the products in your store.
Google Product Feed will generate a link to your e-commerce feed. Since this is a dynamic feed, it will update automatically. However, it’s advisable to regularly check for any update errors to avoid future issues.
Using this link, add the corresponding feed to Merchant Center by clicking on the “Products” → “Feeds” sections. With this, the integration will be complete.
Keep in mind that through Google Listings & Ads, you can manage Shopping Ads campaigns directly from the WooCommerce panel without needing to access Google Ads. Additionally, this plugin offers the option to develop Performance Max pay-per-click campaigns, which integrate AI tools to maximize their benefits.
Linking with PrestaShop
PrestaShop is another of the most widely used platforms for creating e-commerce stores. It has dedicated modules that you can use to synchronize your virtual store with Merchant Center, simplifying the process.
Before starting, ensure that your store complies with Google’s policies and that each product includes the required data. Then, go to the PrestaShop modules marketplace. There, you can choose from integration modules such as Google Shopping PRO and PrestaShop Google Merchant Center Integration.
In the PrestaShop dashboard, click on “Modules and Services” → “Add a New Module,” upload the module’s ZIP file, and activate it. The next step will be to configure the module you’ve selected by connecting it to your Merchant Center account. You can do this directly from PrestaShop, but you’ll need your Merchant Center account ID and your Google account credentials.
Once your site is synced and validated, it’s time to generate your product feed. You can do this with any of the suggested modules mentioned earlier, with the Advanced Export Products module, or manually.
To create a feed using a PrestaShop module, access it from the PrestaShop menu. Then, set up some initial settings, such as the feed format (usually XML), the products to include, and whether you want the feed to update automatically.
Next, associate your store’s categories with Merchant Center’s categories to avoid synchronization issues. Failing to do this is one of the most common mistakes when linking a Merchant Center account with an e-commerce store.
To ensure there are no issues in this regard, use the module’s search tool and select the categories that best fit each type of product. Also, make sure that the module is configured with the mandatory attributes required by Merchant Center.
Only then should you generate the feed. PrestaShop will provide you with a file (dynamic or not, depending on your choice) along with its corresponding URL. To finalize the process, copy and paste this URL into the Merchant Center panel.
If you prefer to manually create the feed, go to the “Catalog” section and then to “Products”. Once there, click the “Export” button in the upper-right corner. This will generate a CSV file containing all the products in your store.
Open this file in a spreadsheet editor (Excel or Google Sheets) and configure the fields to match Merchant Center’s requirements. Then, save it in CSV or XML format, as required by the platform, and upload it to Merchant Center.
How to troubleshoot issues in Google Merchant Center
Nobody’s perfect—even the best-configured Merchant Center account can encounter problems. The good news is that most of these issues can be resolved.
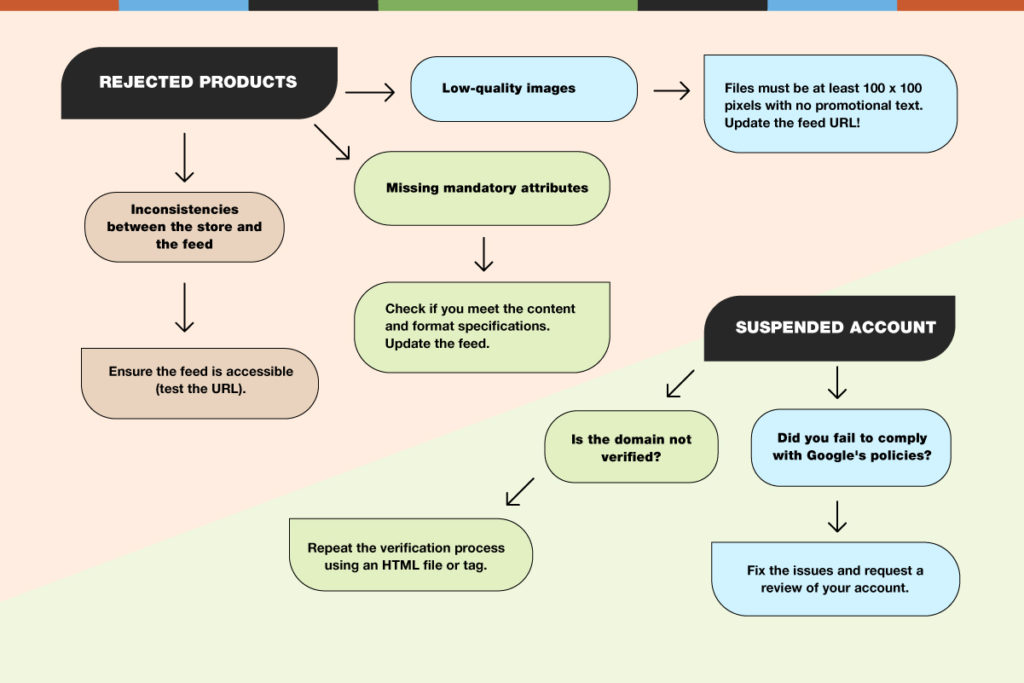
For example, one of the most common complications is having your products rejected by Google. In most cases, this happens due to mismatches between the data feed and the virtual store, missing required attributes in the feed, or the use of low-quality images.
Steps to fix common issues with Merchant Center:
- Check why your products were rejected: In Merchant Center, go to “Products” → “Diagnostics” to see the reasons for the rejection.
- If there are inconsistencies between the feed and your website: Verify that the feed is accessible and functioning correctly. If the feed updates automatically, make sure the plugin or module you’re using is up to date and reconfigure the update frequency.
- If the issue is missing required data: Compare your feed fields with Google’s specifications. Add the missing information either to your website or directly in the XML/CSV file. Ensure that the values are in the correct format (e.g., prices should follow the ISO 4217 currency standard).
- If low-quality images caused your products to be rejected: Replace them with files that meet the minimum resolution of 100 x 100 pixels, free of promotional text. Update the corresponding image URLs in the feed.
If your account is suspended:
Another frequent problem when starting with Merchant Center is account suspension. This usually happens due to specific issues, such as violating Google’s policies or failing to verify your store’s domain.
- Check the reason for suspension: In the Merchant Center panel, go to “Growth” → “Account issues.”
- If the suspension is due to an unverified domain: Repeat the verification process using an HTML tag or file.
- If the issue is due to policy violations: Correct the problems on your website. Request a review of your account from the “Account issues” section.
Tips to avoid common problems:
- Ensure a secure checkout process with an SSL certificate.
- Use HTTPS across the entire website to guarantee user security.
- Avoid selling prohibited or counterfeit products, and refrain from including inappropriate content.
- Clearly display a return policy and billing terms in an accessible location on your website.
- Avoid unethical practices, such as misusing customer data, publishing false information, or including malicious content.
What is the relationship between Google Merchant Center and Google Ads?
As our clients well know, Google Ads is a fundamental tool for enhancing any web marketing campaign. This is because it complements the organic positioning strategies developed through Merchant Center.
However, since it is a paid method, its use must be carefully planned to avoid exceeding the budget. And, if you weren’t born with a calculator in your head, this can be a not-so-easy challenge to overcome.
Merchant Center and Google Ads intersect in Shopping Ads. This tool is designed to manage campaigns on Google Shopping. It is characterized by automatically creating ads using data from a virtual store’s catalog.
Ads offers segmentation options based on feed attributes (name, description, product price, custom labels, etc.). This allows you to optimize your campaign performance by targeting users specifically interested in your offer.
To make the most of this functionality, it is crucial to integrate enriched data into your online store. As we’ve seen, this will improve Google’s accuracy in retrieving data from your website, preventing performance issues like a low click-through rate or few conversions.
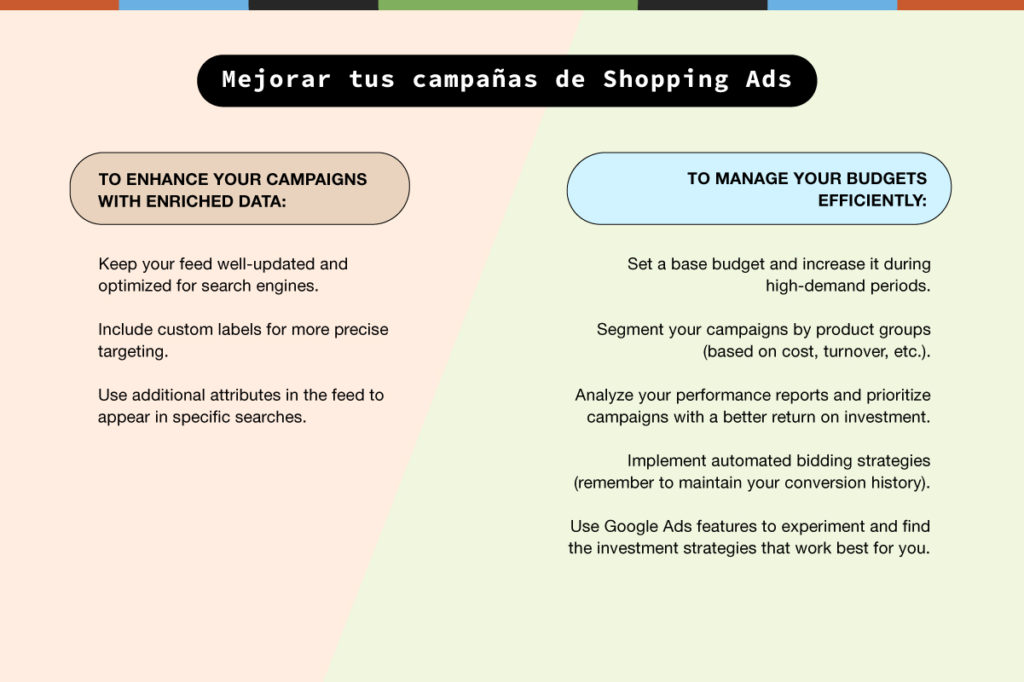
Some of the strategies we’ve applied with our clients to enhance their campaigns with enriched data include:
- Creating an optimized feed with attractive titles, detailed descriptions (with information on materials, benefits, uses, etc.), and high-quality images without promotional texts.
- Using custom labels for more specific segmentation. Implementing tags like “new collection”, “top sellers”, or “on sale” has allowed us to prioritize certain products for targeted campaigns.
- Including additional attributes, such as GTIN/MPN (to improve relevance in specific searches); brand, size, and color (in clothing stores); and promotions (visible discounts in ads).
On the other hand, certain practices can help you efficiently manage your campaigns, avoiding billing or budget issues that may cause Ads to stop running your ads.
The most effective approach is often to hire a digital marketing agency with SEM specialists that offers a quality, results-oriented service with a comprehensive focus. Even so, other highly recommended options include:
- Setting a base budget limit and increasing it on specific dates (like the week before Christmas or during Black Friday). This way, you’ll maximize the impact of your ads during periods of high demand. The Ads Performance Planner is key for forecasting the impact of budget changes for these dates.
- Segmenting your campaigns into “groups” of products based on attributes like price, category, or performance. For example, you can have a group of low-cost, high-turnover products with moderate bids, and a group of premium products with high bids to maximize their visibility.
- Analyzing Google Ads performance reports to identify the products, days, or times that generate the most conversions. This will allow you to increase the budget for products with a higher ROAS, prioritizing your profits.
- To this end, you can also implement automated bidding strategies that use performance data to optimize results. Having a conversion history in your account is crucial to ensure this tool works optimally.
- Experimenting with Google Ads using its experiments feature (appropriately named). Testing different bidding strategies and budget adjustments over 2-4 weeks, comparing them to your original campaign, will allow you to discover which strategies optimize your investment and deliver higher performance.
How to Remove Products from Google Merchant Center?
Most issues in Merchant Center arise when trying to remove products from the platform. Accidentally deleting key products, failing to update the feed after clearing inventory, or removing listings that would have been better paused are some of the most common causes. The good news? None of these issues are serious if corrected in time.
So, to keep playing the good Samaritan, let’s look at how to remove products from Merchant Center, while preventing complications and avoiding errors of this nature.
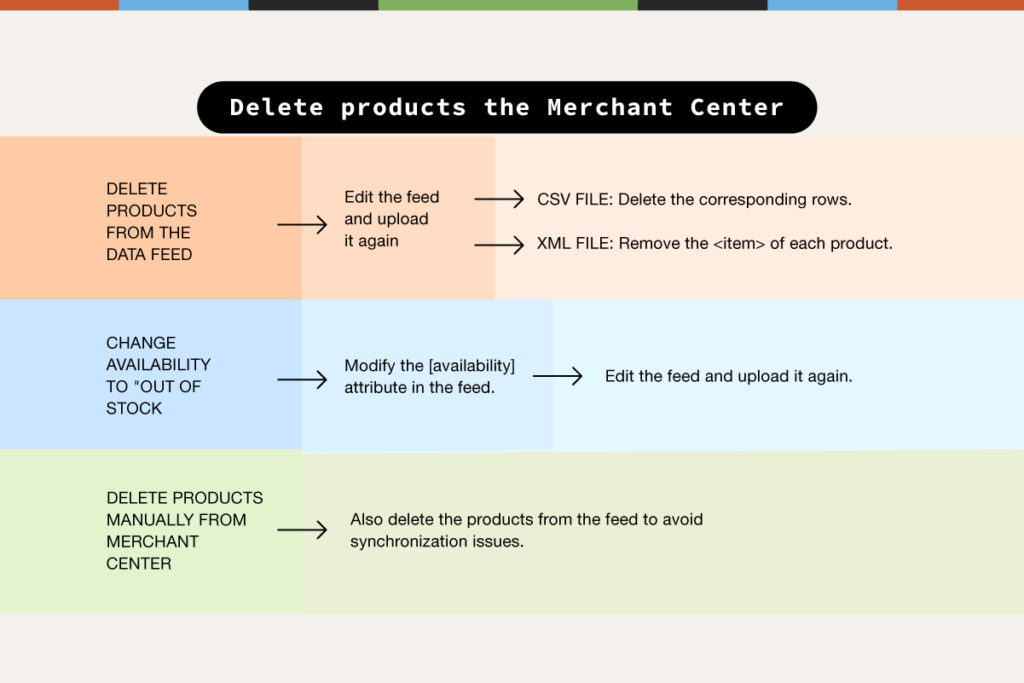
The main methods for removing products from Merchant Center are three:
- From the Data Feed. When products are managed via a feed, this is the most straightforward method. You must edit the original feed and then upload the updated version to “Feeds” in the “Products” section. In a CSV file, you simply delete the corresponding rows. If the file is XML, remove the `<item>` tags of each product you want to delete.
- Change Availability to “Out of Stock”. If a product is temporarily unavailable, it’s better to keep it in your catalog without showing it in ads. This allows you to retain its performance history, avoid indexing delays (which can happen when deleting and re-uploading it), simplify catalog management, and improve user experience. To do this, you just need to change the “availability” attribute in an XML feed to “out of stock.”
- Manually, from Merchant Center. This method doesn’t affect the original feed, so if you re-upload that feed, the products will reappear in your catalog. To remove them, go to the “Products” section, select the ones you want to delete, and click the “delete” button.
That said, none of these methods are free from issues. Therefore, when removing products from Merchant Center, it’s important to:
- Validate the feed before uploading it if you’ve made any modifications. Make sure you haven’t accidentally deleted any products, and use the Merchant Center diagnostics tool to check for errors.
- Maintain consistency between Merchant Center and the feed when deleting manually. Deleting them from the feed as well prevents them from reappearing during the next synchronization.
- Disable automatic synchronization while working with the file, especially for large-scale feed changes. This helps prevent catalog errors.
- Monitor the impact of the removal in the “Diagnostics” section of Merchant Center. In Google Ads, check that there are no product groups associated with the deleted items, to avoid empty ads.
Finally, keep in mind that, at times, Google may continue to display the deleted content if it crawls it on your online store. To prevent this, implement tracking and indexing controls. This way, you’ll be able to more easily manage which of your products are displayed.
Merchant Center: Your 100 % digital store just a click away
Knowing how to use Google Merchant Center is key to driving the growth of an online store. Being a relatively simple tool to use, compatible with various platforms, and, on top of that, free, its benefits far outweigh the effort required to learn how to use it… or to hire a web marketing agency (it’s not us saying this, but our clients).
Merchant Center allows you to manage the visibility of your products, boosting your presence through paid campaigns in Shopping Ads and organic ones on the web. It offers features to optimize the performance of your advertising: from automated bidding strategies to metrics that help you uncover the trends your customers are following.
If, in addition, you combine its use with other Google tools like Analytics or Search Console, the performance of a web marketing campaign can be further optimized. Are you ready to give it a try? Let us know in the comments how it went!
From the customer’s perspective, Merchant Center provides an enhanced and comprehensive shopping experience. Specifically, it focuses on the user’s search intent by presenting specific results with the necessary data to make informed purchasing decisions aligned with their interests… and on every imaginable platform.
That said, to achieve optimal results, the tools Google offers require a level of time and dedication that (as many of our clients could tell you) is often hard to find…
But the benefits are many: enough to make it well worth including them in your web marketing strategies. Especially when, just one click away, there’s a solution.
We are MD Marketing Digital, an agency of online marketing professionals. We want to help you overcome the challenges of the digital age so your business never stops growing.
We have a team of specialists in developing online stores and, above all, in promoting them through paid and organic campaigns that address every detail of your website.
We stand out for offering a comprehensive service. We work on different aspects of online marketing from a global perspective, aiming to deliver quality results that impact your brand’s online presence.
Over fifteen years of experience and clients on five continents back us up. At MD Marketing Digital, we’re ready to tell your story and help you bring it to your customers.
Contact us or visit our website to learn how our offerings can be tailored to your needs. With us, achieve a 100 % digital store, adapted to the latest e-commerce trends and Google policies.
Digital transformation is already a reality. Are you going to stay behind?
- Best Email Marketing Agencies in Argentina: MD Ranking - April 14, 2025
- Top 10 Best Web Design and Development Agencies in Argentina - April 7, 2025
- MD Marketing Digital Ranking Research Methodology - February 7, 2025
¿Qué te pareció este artículo?
What do you think about this post?




This was a great overview! One thing I’d like to highlight is how Merchant Center’s free product listings can help businesses attract more organic traffic, especially when starting out with limited budgets.
Thank you for your comment! We’re glad you enjoyed the overview. You’re absolutely right—free product listings in Google Merchant Center are a great opportunity for businesses, especially those starting out with limited budgets, to boost their visibility and attract organic traffic. It’s an essential tool for reaching potential customers without upfront ad spend.
It’s so true that the competition is getting fiercer in the e-commerce world. Google Merchant Center seems like a powerful tool to level the playing field by giving businesses better access to potential customers across various Google platforms.
The emphasis on feed quality really stood out! Do you have any tips for smaller e-commerce businesses to streamline data feed management while maintaining accuracy and alignment with Google’s specifications?
Thank you for your insightful comment! We’re glad the emphasis on feed quality in our Google Merchant Center blog stood out to you. For smaller e-commerce businesses, we recommend using tools like Google Sheets for simple feed management or platforms like DataFeedWatch to streamline the process while ensuring alignment with Google’s specifications. At MD Marketing Digital, we’re here to help—feel free to reach out if you have more questions!